
Epoxy flooring is installed on concrete by assessing the slab, removing contamination and weak material, repairing defects and preparing a surface suitable for the selected system. The installer applies the specified primer and flooring layers using the manufacturer’s mixing, working-time, recoating and curing instructions. The exact build and schedule depend on concrete moisture, slab condition, intended use and the applicable technical data sheets.
What must be checked before epoxy goes on concrete?
New and existing concrete must provide a sound, suitably prepared base that meets the selected flooring system’s moisture and surface requirements. A floor that looks dry is not automatically ready for coating.
The assessment should identify loose or deteriorated concrete, oil and other contamination, previous coatings or sealers, cracks and movement joints. For an existing floor, establish what remains bonded and compatible. For new concrete, check the selected system’s age, strength and moisture requirements rather than relying on a single waiting period.
Sherwin-Williams’ concrete preparation guide treats inspection, decontamination, profiling and repairs as distinct tasks. Its moisture appendix also explains that a plastic-sheet check is qualitative: it can indicate a need for further testing, but does not quantify moisture movement. Ask which test method and acceptance criteria apply to the proposed floor.
Record the floor’s future use as well: pedestrian or vehicle traffic, equipment loads, cleaning methods, chemical exposure and desired finish. For the detailed substrate work, use Ressichem’s concrete preparation guide; the installation sequence below focuses on how that preparation connects to the complete flooring system.
What are the installation steps?
Epoxy flooring installation follows six broad stages, with a readiness check before the next stage begins. Some projects need additional repairs or moisture-control measures; the layer count and application tools follow the approved system.
1. Assess the slab and select the system
Choose the flooring build around the slab condition and intended service. Confirm the compatible primer, repair materials, body layers and finish, together with any special moisture treatment. Agree on the appearance, texture, traffic requirements and areas that must remain closed during installation.
Before work starts, the proposal should identify the product documents and the condition that would stop installation. “Apply epoxy” is an incomplete scope if it leaves repairs, moisture investigation or layer selection undefined.
2. Clean, mechanically prepare and repair
Remove contamination and unsuitable surface material, then create the required surface profile: the texture that allows the selected coating to bond to the concrete. Mechanical preparation may involve grinding or shot blasting, chosen for the slab and specified system.
Remove preparation dust and assess repairs before coating. Ressichem’s preparation article distinguishes stable defects from cracks that may indicate movement. Joints also need an agreed detail; Ressi EPO Floor Plus’s datasheet specifically requires expansion, control and isolation joints to be carried through its flooring system. A smooth coating should not simply conceal unresolved movement.
3. Verify moisture and site readiness
Review the prepared slab against the specified test results and acceptance criteria. Initial moisture assessment guides selection; the final readiness check confirms that coating can proceed after preparation and repairs. Pause if the results fall outside the selected system’s scope.
Check air and slab temperatures, humidity and condensation risk before application. A surface can collect condensation even without visible standing water. Sika’s Sikafloor-1230 documentation illustrates why manufacturers specify separate substrate-moisture, humidity and dew-point conditions. Those values belong to that product, rather than every epoxy floor.
4. Apply the specified primer or moisture-control layer
Use the primer chosen for the prepared concrete and subsequent layers. Ressi EPO Primer’s datasheet describes its role before epoxy flooring and coatings on concrete and cementitious surfaces. The installer should check coverage, continuity and the required condition of the primer before applying the next material.
A standard primer should not be assumed to solve excess moisture. Ressichem publishes a distinct high-moisture substrate system, but that requires its own assessment and compatible build. Active water movement needs investigation; adding another coat is not a substitute for establishing the source.
5. Measure, mix and apply the specified flooring layers
Identify every component and follow the selected product’s ratio, measurement basis, mixing order and equipment instructions. A system may contain resin and hardener, or additional fillers and aggregates. Do not transfer a mixing ratio or method from another epoxy product.
Plan each batch around its permitted working time. Apply the material with the specified tools and check the intended layer thickness or consumption as required by the system. Intermediate layers, aggregate finishes and separate topcoats are included only where the approved build requires them.
For poured systems, Sherwin-Williams describes spreading mixed material over prepared concrete. This illustrates one application route; it does not turn every epoxy coating into a self-leveling floor. Record batch identification, application conditions and coating times so any later issue can be investigated.
6. Protect, cure and inspect before handover
Protect the fresh floor from unauthorised traffic, contamination and water exposure while it cures. The reopening schedule should distinguish permitted foot traffic from equipment, washing or chemical service. Obtain those conditions from the selected system’s instructions.
Before handover, review the agreed finish, continuity, edges, joints and any required quality tests. Record incomplete or suspect areas, the permitted return-to-service conditions and the cleaning instructions. Appearance alone does not verify hidden adhesion or moisture performance.
The following table is an installation checklist, not a product specification.
Stage | What happens | Check before the next stage |
1. Assessment | Slab and service conditions define the system | Compatible materials, site limits and scope agreed |
2. Preparation | Cleaning, profiling and appropriate repairs | Sound, clean surface; defects and joints addressed |
3. Readiness | Moisture and environmental conditions reviewed | Results meet the selected system’s criteria |
4. Priming / special treatment | Specified primer or approved moisture-control build applied | Continuity and next-layer condition confirmed |
5. Flooring layers | Components mixed and layers placed as specified | Working time, build and recoat requirements met |
6. Cure and handover | Floor protected, inspected and released for service | Required cure achieved; defects and aftercare recorded |
Source basis: Ressichem’s preparation guide, Ressi EPO Primer TDS, Ressi EPO Floor Plus TDS and manufacturer preparation guidance support the general stages. Acceptance limits and layer interfaces require project-specific confirmation.
The practical takeaway: do not move to the next stage merely because the previous activity is finished; verify that its acceptance conditions have been met.
How do the primer, body coat and topcoat depend on the floor?
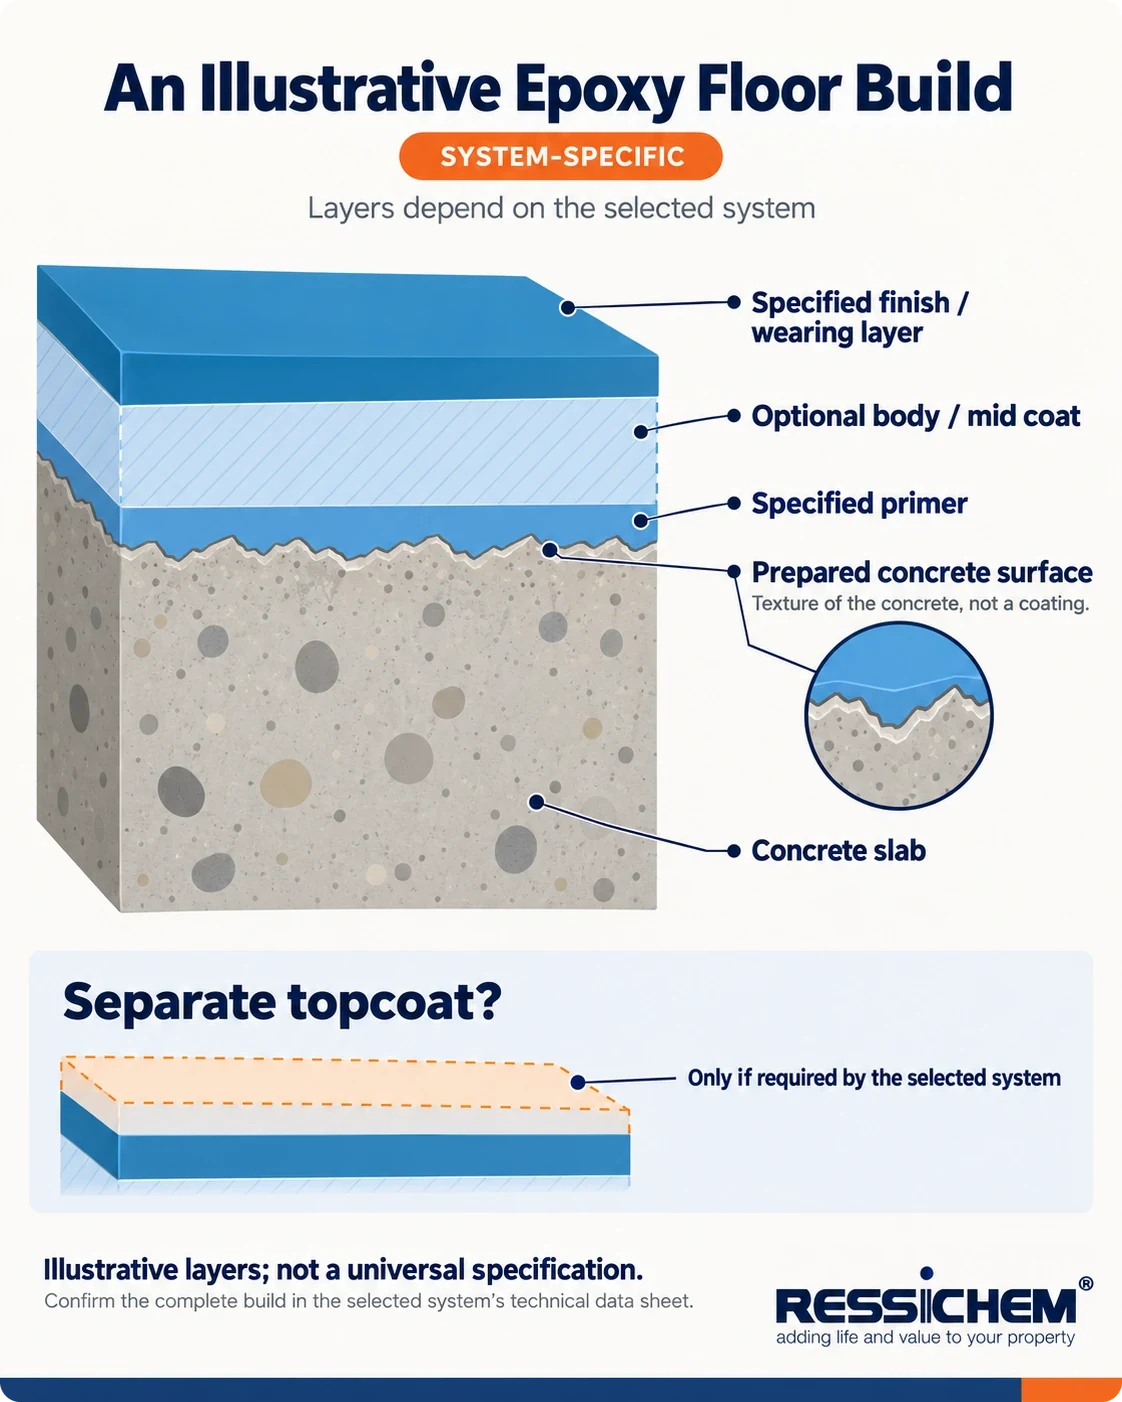
The layers depend on the required duty, finish and selected system. Primer prepares the interface with concrete; a body or mid coat provides the specified flooring build; a separate finish coat provides the selected surface characteristics where required.
Ressichem’s Epoxy Floorings & Coatings category separates primers, mid coats, two-component topcoats, three-component heavy-duty flooring and thin coatings. These categories provide options rather than a requirement to use every component on every floor.
Thin coating: uses the specified coating layers over the approved substrate and primer arrangement. It should not be treated as a remedy for significant slab damage.
Poured or self-leveling build: uses a formulated material and placement method to achieve its specified build and finish. It still requires suitable preparation and repairs.
Heavy-duty system: may incorporate additional components and aggregates. Ressichem identifies Ressi EPO Floor Plus as a three-component flooring product; selection still requires confirmation of the complete build and service conditions.
The Floor Plus product information is one example of a different construction from a thin coating. Traffic, chemical exposure, cleaning and slip requirements should guide the specification. Do not infer a tested slip classification or chemical resistance from gloss or texture alone.
How long before the floor can be used, and what can go wrong?
The floor can be used when the selected system has reached the cure required for the intended activity under the actual site conditions. A dry-looking or tack-free surface does not establish readiness for full service.
Keep these timing terms separate. Ressichem’s primer datasheet and Floor Plus datasheet report different working, recoating and curing stages; Sika’s flooring documentation also separates foot traffic from full cure.
Pot life: the usable working period for mixed material under stated conditions. It is not the time available to reopen the floor.
Recoat window: the permitted interval and surface condition for applying the next layer. If it is missed, obtain the specified remedial preparation before continuing.
Tack-free or walk-on stage: tack-free describes surface condition; permission for foot traffic must be confirmed separately.
Full service cure: the stage required for the specified operational exposure. Washing, machinery and chemicals may need different release conditions.
For Pakistani projects, check local heat and humidity against each product’s instructions and record changes during the work. Ressichem’s temperature and humidity article discusses their effect on application and curing. Use the selected TDS for acceptance limits and scheduling rather than a nationwide weather rule.
Peeling, bubbles, tackiness or uneven coverage warrant inspection, but a photograph does not establish a single cause. Review substrate preparation, moisture results, component identification, mixing records, application conditions and layer timing before specifying a repair.
How hard is it to put epoxy on a concrete floor?
Difficulty depends on both the coating system and the slab. An industrial poured floor requires more than spreading a liquid: moisture assessment, preparation equipment, compatible repairs and timed application need appropriate skills. Sherwin-Williams’ poured-floor guide expressly describes professional installation for its industrial systems.
Use a qualified installer or testing specialist where moisture is uncertain, concrete is damaged, movement is present or the service conditions are demanding. Follow the chosen products’ safety data sheets and the site safety plan for preparation dust, chemical handling, ventilation and protective equipment.
Concrete ke floor par epoxy flooring kaise lagai jati hai?
Epoxy flooring is installed on concrete by checking the slab, assessing moisture, removing contamination and weak material, and completing the required preparation and repairs. The installer then applies the specified primer and compatible flooring layers according to the selected system’s mixing, working-time and recoat instructions. Protect the floor during curing and confirm the permitted foot traffic and full-service conditions before reopening the area.
Plan the complete installation before coating
A competent epoxy flooring installation connects a suitable concrete base with compatible layers, controlled application and the correct return-to-service conditions. Agree on the checks and responsibilities before materials are mixed, including how unexpected slab or moisture problems will be handled.
Explore Ressichem’s epoxy flooring and coating systems. For project-specific guidance, provide the slab area, condition, moisture findings, expected traffic, exposure and desired finish. Use that information to establish the appropriate system and installation scope.
Frequently asked questions
How much does 1000 sq ft of epoxy cost?
A reliable quotation for 1,000 sq ft needs the slab condition, repair and preparation scope, moisture treatment, flooring build and desired finish. Labour, location and access also affect the installed scope. Request a dated, itemised quote rather than applying an unsupported Pakistan-wide rate.
How much is 20 litres of epoxy?
A 20 L quantity alone does not identify the product or complete flooring system. Confirm whether the volume includes every required component, then obtain the product price and documented consumption for the specified layers. Do not assume a 20 L purchase covers a fixed floor area.
How long will epoxy last on concrete?
Service life depends on the selected system, concrete condition, installation quality, traffic, chemical exposure and maintenance. A generic year range cannot establish how a particular floor will perform. Ask for the proposed system’s service limitations and maintenance requirements.